See Your ROI with Greenlight Guru in Seconds

Experience the #1 QMS software for medical device companies first-hand. Click through an interactive demo.


Does your company have approval for IEC 60601-1? If you produce medical electrical equipment (MEE) or systems you soon will have to as this general standard applies to all devices.
We recently had Leo Eisner, President and Principal Consultant of Eisner Safety Consultants onboard for a chat about IEC 60601-1. Leo is a registered Professional Engineer (P.E.) in the Safety Engineering discipline. He has worked at some of the leading Safety Agencies in the world (UL & TÜV Product Service) and has 30 years experience in the Product Safety arena. When it comes to 60601-1, he’s your person. “The IEC 60601-1 guy”.
As with anything in the medical device industry, there are a lot of technical requirements and regulations that a developer of electrical medical equipment must follow. Electrical safety and the overall safety and efficacy of the product is obviously the ultimate goal, but often people get a bit bamboozled by the IEC series of standards.
IEC 60601-1 is the basis for the whole series of collateral and particular IEC standards. Depending on the country you are getting approval for, you’ll be following either the 2nd, 3rd or 3.1 version.
While 60601-1 is the basic general standard, particular standards branch off into specific devices, such as high frequency surgical, endoscopic equipment, and infant incubators. The collateral standards are broad based requirements that one or more may apply to your device, such as EMC, Usability Engineering Analysis, and Home Use Environment.
There are also guidances, which are technical reports, that are separate from the general, collateral and particular standards. You can see an overview in the diagram below:
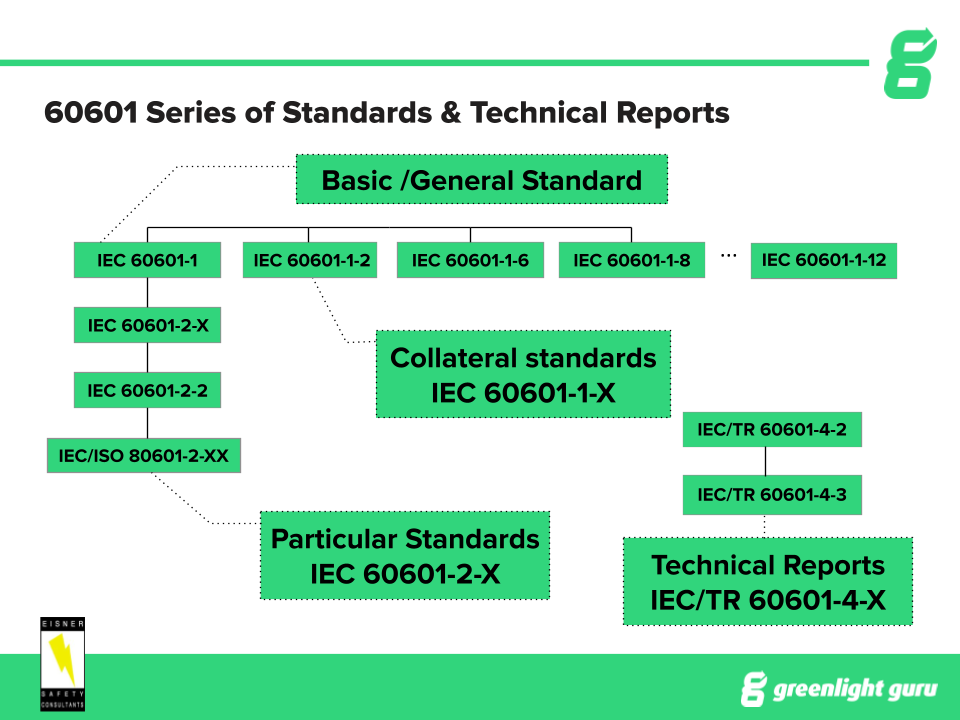
60601-1 will always apply, if your device falls under the scope of the general standard, but you will need to figure out which collateral and particular standards apply to your specific device.
Here are 15 steps to follow in order to gain 60601-1 approval. Please note these aren’t necessarily the same order you will do them in - figure out a system that works best for you:
You should include a plan to map out all of the applicable 60601 steps. Remember, each project will be different depending on the type of device you are creating. Yours may have additional or fewer tasks compared to another.
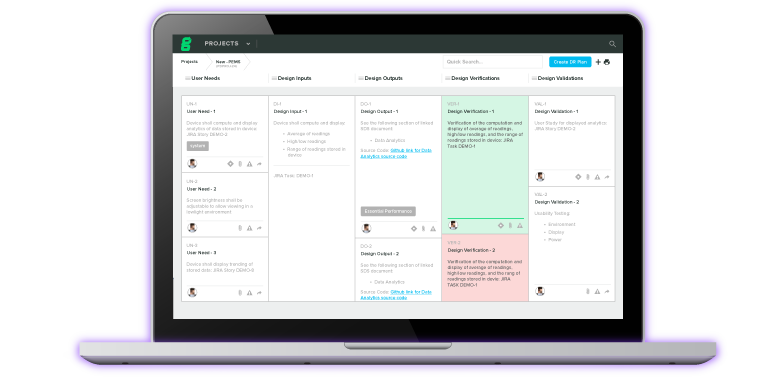
We recommend you use software a software solution like Greenlight Guru to help you manage the details of your project, maintain a single source of truth and ensure excellent communication within your team.
The first thing you want to check is if your project is within the scope of the 60601 standards. If not, you may be looking at the wrong set of standards for your device. The scope applies to basic safety and essential performance of medical electrical equipment.
Pay attention to any asterisk when reading the clauses the standards as these point to the guidance & rationale annex for the clause. The guidance and rationale annex explains more from the background or what developers were thinking when they created it. These can provide you with “aha” moments of understanding.
Most medical electrical devices will fall under 60601 and even some that are out of scope are pushed by FDA to use the standard.
You also have to understand which collateral standards apply and any particular or other standards.
The next step is to classify your product as per IEC 60601-1 and any collateral or particular standards that apply.
For example, every device will need to be classified in terms of protection against electric shock. A device that has a grounded power source will be Class I, whereas one that is ungrounded would be Class II. “Other MEE” applies to units with an internal power source or battery.
You’re also looking at any applied parts, which will have symbols associated with their classification.
You will also need a rating for protection against harmful ingress of water and particulate matter (optional for the general standard). IPX1 rating or higher (IPX8 is highest) require you to perform a 7-day humidity test on your device. For a rating of IPX0 or “ordinary”, you do a 2-day humidity test.
Other classifications to look at include:
Creating an isolation diagram early on helps you to identify your required insulation systems so you can plan your design early. There are different requirements according to the isolation barriers you have, which should you need to change after the fact, can be very expensive.
The other point here is that should you figure out early that you will have quite expensive requirements to meet, it gives you the chance to figure out an alternative design if possible.
The main concept of the standard is that there should be two levels of protection, in case of the failure of the first level. The standard is concerned with both operator and patient protection and defines “means of protection” (MOP) as:
You don’t always have to have two MOP, but if you only have one, you also need protectively earthed parts for that specific isolation barrier you need to consider.
There is a huge list of possible critical components which you will need to identify yours from. Just briefly, these might include components for:
Mains components
Isolation for safety
Flammable components (Plastic enclosures, wiring sleeving, etc.)
Line filters (medical or non-medical)
Hint: Using non-medical may cause your leakage current to go up and fail testing but you need to also balance with EMC test requirements which non-medical line filters tend to do better at.
As part of this step, you should also gather critical documents, as shown below:
UL component certification and COA’s (conditions of acceptability)
Engineering specifications
Engineering drawings
Test certifications and reports (required for components)
CB certificate and test report for power supplies
Label Material
The important reason behind identifying and documenting your essential performance is that it will impact upon your test plan. “Essential performance” is defined as:
“Performance of a clinical function, other than that related to basic safety, where loss or degradation beyond the limits specified by the manufacturer results in an unacceptable risk.”
The process to follow in identifying essential performance involves:
Usually, essential performance will apply to critical care equipment such as those for anaesthesia or ICU monitors. There are many cases where it applies to less critical devices too - every product should be analyzed. The FDA has been asking for an analysis even if you don’t have essential performance.
Remember also that any change to the intended use of the device can change its essential performance. You might also find that if you’ve used a predicate device with essential performance, it will be expected of your device.
As for your risk management file (RMF), a key point to note is that you can’t comply with 60601-1 without also complying with ISO 14971. You need to have gone through your risk analysis early on.
Putting together your RMF is a lot of work. You need to use the CB scheme technical report or TRF and lab paperwork. You’ll find that many of the compliance statements in the 60601 standard say “compliance is checked by inspection of the RMF”, so it needs to be spotless.
You’ll find that if you’ve done the work for ISO 14971:2019, putting together the RMF paperwork will be much easier. You need to include all RMF and RMP documents and fill out a “map” with risk management requirements in the TRF (a CB scheme document called test report form).
Most of all, the documents you provide to your test lab need to prove that you fully meet the RMF requirements of the general, collateral and particular standards. For the first timer the task of filling out RMF requirements of the TRF takes about 30 days of work time for someone putting one together.
With 60601 series of standards, the testing required is “type testing” as opposed to the process-based standards such as IEC 62366 (Usability Engineering Process) or IEC 62304 (Life-cycle Software process). This means you must test on a representative sample of the device and determine if the device meets the requirements of the standard as it is. These samples must be as close to production as possible.
Your test plan can put together tests for more than one standard and roll it into one plan. This tends to be easier than putting together several different plans. But EMC (IEC 60601-1-2) should have a separate test plan as the 4th edition (most current edition) requires the manufacturer to put together a specific test plan per the standard.
As mentioned earlier, your essential performance and risk management file (RMF) will impact your testing requirements. This is why it’s important to get these done before your test plan.
Leo gives a draft test plan to the testing labs and asks them whether they agree with it or not. This helps to put you on the same page. Look for the remarks for specific tests as these help you to understand important details.
Should you have tests that are non-applicable, Leo would still mark them in the plan and explain why they aren’t applicable.
This involves a lot of reviewing. As you will understand, the goal is for your product to be labeled appropriately so that users don’t miss critical instructions.
Here are the steps Leo suggests for reviewing your marking and labeling (manuals, etc.) against the requirements of the applicable standards:
Review all markings on or in your device. Remember to look for things like symbols, safety signs, switches and units of measure.
Review your user manual and any quick-start guide you may have.
Review your technical description. This is typically in the service manual for bigger equipment, but may be embedded in the user manual for smaller equipment.
Check all labeling requirements within the collateral and particular standards. Sometimes these involve several pages of requirements.
Check for readability requirements. These change according to the applicable country (for home use the readability requirement is to 8th grade).
Here’s a point that really should be emphasized: the context of who is reading your user manual or labeling is important. For example, think about a layperson who might be reading your user manual for home use, either as a patient or as a caregiver. On the other hand, technical descriptions generally go to the responsible organization, such as a hospital or to service personnel.
Context matters - you can obviously expect trained personnel to have a better level of understanding of any medical terms.
The two labeling tests you need to be particularly aware of are:
The main question is, does the device meet all of the constructional requirements of the General Standard, IEC 60601-1 and any applicable collateral and particular standard? This might include things like physical requirements, spacings and power supply.
To be thorough, you need to review all applicable tests as some of the tests themselves will identify for you construction requirements, such as those for grounding or enclosure material requirements.
Use the TRF as a guideline to help you work through this, but be careful. The TRF is a summary of the requirements and doesn’t include everything that the standard has to say.
As part of this, you should:
Review component information and ensure it meets the proper standards (identified in step 5).
Check that your isolation diagram is up-to-date with the latest design. If not, you’ll have to update it and again ensure that your design meets the standards.
Check that your test plan is up-to-date and covers all applicable tests.
Check that your marking and labeling meets the standards as per step 8.
Note that the standard even refers to the ISO standard for biocompatibility, so this may be a requirement for your device, too.
What is a suitable test lab for you? Are you locked into using a particular lab? Do you like the test lab that you’ve been working with? Note that if you’re wanting to change labs, it will have implications you should consider closely before changing test labs.
You should have an understanding of what you’re looking for in a lab. For example:
Solid test reports to support your regulatory submission(s) and a good reputation.
Expertise in any specific tests that you need. For example, some tests require very expensive equipment that not every lab will have.
Would you prefer a local lab?
Do you need the fastest option? The portability of your device may come into play.
Reputation matters. Some labs are not worth the hassle.
Cost - does it matter? The most expensive doesn’t necessarily mean the best.
If the lab ships some testing to another lab, make sure you ask if you have recourse for that lab. For example, some testing labs in Asia do not have great reports.
Be careful about independent test labs. There are a variety of abilities in those test labs. Leo has had clients who have had to spend a lot of time and money getting things redesigned or retested to satisfy the regulatory body (i.e. FDA, EU Notified Body, etc.).
The best advice here is to be as specific as possible about what you need from the lab to improve the accuracy of your quote. There have been many cautionary tales of companies who have ended up with huge cost overruns, more time taken than expected for testing or even the wrong testing standard used, meaning a repeat is needed.
Make sure you identify the product, product family and version as well as all applicable standards to be tested to. Fill out their RFQ form completely. Note that the particular countries for which you need certification can add costs to your testing.
You should also make sure you talk to the lab early about any special requests you might have. For example, you might need fast turnaround, special testing, heavy equipment or testing at your own location. All of these need to be factored into a quote.
In step #6 we identified RMF and essential performance - here our job is to finalize them, making any updates as necessary.
Again, you should ensure that you review the text of the standard and don’t just rely on the TRF wording, as this is at best just a summary. Your job is to prove that you meet ISO 14971, as this standard is upheld in 60601. ISO 14971 is not done as an audit of your RMP but by a desk audit of the documents provided.
Your RMF will impact your RA, so make sure you’ve updated the RA to reflect RMF input before you submit to a testing house.
You also need to write up and confirm your essential performance and show how you confirmed each clinical function that is considered to be essential performance (EP). Complex EP can impact testing time as some tests will need to be repeated to confirm it as a criteria for compliance.
Pre-testing can be very helpful, particularly if your device is a brand new technology, but it’s up to you how far you want to go with pre-testing - what are you comfortable with?
Are you able to do it in-house, or do you require a test lab?
You don’t generally need to pre-test every aspect, but you should give some consideration to what will be useful to you. Generally, Leo suggests that pre-testing for humidity isn’t usually worth it.
If you’re not comfortable with the standard yourself, you can always go through a testing lab, although be careful about this as it will cost you money and as Leo says, you might find they want to cover extra tests. He does know some great independent testing facilities if anyone would like to know (contact him here).
If your device fails pre-testing, you need to look at whether it requires a redesign. If so, how does that affect critical components, product classification and all the other important points discussed in other steps? There’s a chance that a lot of these will need to be reviewed.
You need to be prepared with what you will need to provide in order to get the testing done. Typically, you need at least one functional device, although it’s always better to have a backup or more, if necessary.
You’ll need spare parts such as; fuses, power supplies, spare accessories and populated PCBs. You’ll also need your labeling and markings.
A note here is that many EMC labs don’t know the labeling requirements well so won’t be able to help you, but there are some good ones who do know them and can help you.
For safety testing, you’ll require the same for devices and parts, but it’s acceptable to provide a drawing for labeling. You should also provide all supporting documentation.
As for your critical project timelines, there are a few things you can do to ensure that you keep things running smoothly:
Have all supporting documentation ready, including your RMF and TRF as per lab will request you fill out certain forms that need to be provided at the start of the project
Have marking and labeling materials ready
Have signed agreements with the test lab
Promptly pay any required deposit
Include component certification information
Have any required factory inspection paperwork
Set up your production line test equipment to meet IEC 60601-1
Have good open communication established with your test labs. Make sure you have an agreement of start and end dates for all parts of the process, including testing, factory inspection and review of the RMF. It’s not always easy to get timelines out of the lab, but it’s worth asking.
Check in with them, but don’t be a pain about it. They often have many projects on the go at once. At the same time, don’t wait until the very end to check in as it could cost you a lot more time.
In the event that your product fails some testing, you usually have some options. They might put the project on hold and request you either provide a resolution by a due date and may increase your cost. They might close the project and issue a letter reporting current issues.
Just remember, that the best-laid plans can go awry so it’s better to have built some buffer time into your project plan. Leo recommends a minimum of 2-4 weeks on top of the time estimate you receive.
You’re not done once you get your report! It’s now time to check the report and certificate for any anomalies, typos, incorrect descriptions or anything else that just isn’t right. It’s much better to do so ASAP and advise the lab of any requested changes within a 2-4 week window. If you are slow on this, they might want to charge you extra for the corrections.
Hopefully this article has helped to shed some light on the 60601 process for you. A key takeaway is that doing proper legwork upfront, such as by following the 15 steps we outlined, can pay off.
The Scouting motto of “be prepared” applies to all medical device companies who would prefer to get a safe, effective device to market as quickly as possible.
Looking for a design control solution to help you bring safer medical devices to market faster with less risk? Click here to take a quick tour of Greenlight Guru's Medical Device QMS software →